Sunday, 5 August 2012

The history and evolution of SEO

Note: A new version of this infographic is available, including 2010:
 - The History of SEO, 1993-2010
The original post follows...
-----
Ever wondered when links became such an influential component of SEO? Or when Google released the infamous "Florida" update and what effect it had on search engine optimisation? Perhaps you're interested in the origins of the unsolicited link exchange, or want to know when (and why) nofollow was created.

All these questions and many more are answered in Greenlights SEO History of the Internet, a graphical two page "cheat sheet" plotting the evolution and history of SEO and key events that have happened during the fourteen year history of the industry.
Here at Greenlight the history of SEO is something we find quite fascinating.  But while there are many disparate sources of information on the topic, I was unable to find a single source that packaged all of the key events that have happened in our industry in a single, graphical timeline.  Thus, I give you the History of SEO (click for full res images):
History of SEO 1994-2001

History of SEO 2002-2009
The images feature a chart showing how the importance of various factors in search engine algorithms (and therefore SEO) has fluctuated over time, from the early days of search engine submission and on-page SEO, to the introduction and dominance of PageRank and other link based metrics, to today's much more complex and nuanced picture. The factors plotted on the History of SEO chart are as follows:
Search Engine Submission - Manually or automatically submitting a site to a search engine, necessary in the early days due to the fact that search engines had limited (or non existent) crawling capabilities, and still yielding limited results years later.
On Page SEO - The practice of ensuring a site is both accessible to search engines and relevant to the terms you are targeting by the placement of keywords on page, on page SEO includes considerations of website architecture, build and content writing.

PageRank (or similar)
- The use of links by search engines to judge the importance of a page flipped SEO on it's head and became the dominant factor in the early years of the decade. In this chart, PageRank essentially refers to the raw credibility conferred by links to a given page.
Anchor Text - The use of link text to add context to the raw credibility provided by PageRank et al...
Domain Authority - Link factors, including PageRank and links from trusted sources, assessed at a domain level rather than at a page level; the idea being that all other things being equal a page launched on a site with higher domain authority will rank better than a page launched on a site with low domain authority.
Link Context - Link context refers to the placement of links on a page and, more importantly, the context of the page and the site the link is on. Link context brings an additional level of complexity and detail to the analysis and acquisition of links beyond merely looking at the raw credibility of a link and its anchor text.
User Signals - The use of user behaviour, such as click through rates, bounce rates and search patterns, by search engines to assess the level of trust search engines have in a site. User signals were not felt as a serious part of search engine algorithms until this year when Google implemented the Vince algorithm update.
Alongside this chart we've described key events and turning points that have influenced or evidenced the evolution of search engine optimisation - whether that be the launch of a new search engine, the first SEO conference or an algorithm change.
For newcomers to SEO this is an invaluable primer on the industry and a fascinating journey into the past, while we hope that it will bring a (sometimes rueful) smile to the face of you old timers out there.
References
By necessity the task of assembling an accurate history of SEO consists in large part of compiling and comparing dates and information from a wide variety of other places. During the course of my research I came across too many resources to mention them all individually, but the key sources of inspiration and assistance to which I'm indebted were (in no particular order):
 - Brett Tabke's brief history of SEO thread on Webmaster World.
 - Mark Knowles and his site the history of SEO.
 - Rand Fishkin's how google's ranking algorithm has changed over time.
 - Google's milestones corporate information page.
 - Aaron Wall's search engine history.
 - Last but by no means least some invaluble input from Danny Sullivan of search engine land.
If you liked this infographic, see also the history of paid search.

Source: http://gossip.greenlightdigital.com/blog/the-history-and-evolution-of-seo/

Friday, 3 August 2012

Play DoTA like a BOSS ! (Ranked Gaming Client)


I recently discover this server of DoTA (which more likely Garena) that will actually enhance your DoTA skills and teamwork to others.

Ranked Gaming Client.= www.rankedgaming.com

LAG free than Garena - one of the most reason why players quit on Garena when in-game because of the lag. If you play Garena before, I know you actually experience the lag when playing, its kinda annoying right? And one the reason why lagging is either because of the HOST or the Player itself.

-but when it comes to RGC it is a server based Client so no more (BOBO Host kasi hindi nag CP) anymore. If the lag comes not only you will be affected but also the other players. (If the server is Lagging not YOU)

The Game Mode
-CM (one of the reason why I love this Client)
One of the Modes in DoTA that professional Gamers uses.

Less Quitters more FUN:
In Garena when you quit the game, no PENALTY will be applied but when it comes to RGC, it`s either you get BANNED to the server or you PERMANENTLY BAN from playing the Server.


How to Install and play the CLIENT:


Download, Install and run RGC.

  • Download "Ranked Gaming Client" latest version from here: Click here!
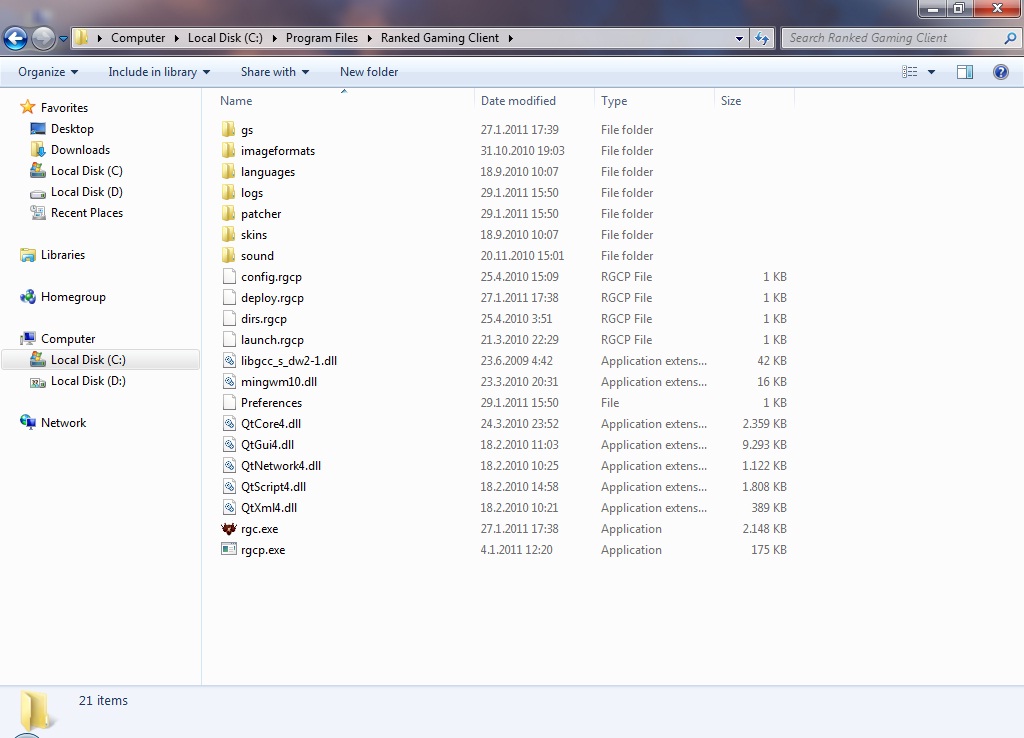
  • Extract files from downloaded content. There is no rule where you must extract files. In case below, I extracted files into "Program Files".
Extracted content


                                                 Picture 1. Extracted content

Go to extracted "Ranked Gaming Client" folder and run "rgc.exe". If updates are available, patcher will be showed. Update will be automatically downloaded and installed. After that, "Connect" window should pop-up.

Notes:
-If you are using "Windows 7" be sure to run "rgc.exe" as a administrator. If "RGC" fails to update, first run rgcp.exe as a administator.
-If you experience any other problems, bugs, feel free to check our Support Center.
-Your "Connect" window layout could look different because default skin may vary but more about that in upcoming chapters.

                                                      Picture 2. Connect window

Make account and login into client.

After you click on "Connect" button, "Login" window should pop-up. To make new account click "Register" button.

Notes:
-If you are unable to connect, probably your antivirus is blocking "RGC". So you must put "RGC" on safelist. How to do that
would depend on the antivirus you use.

                                                       Picture 3. Login window

In "Register" window fill all fields with required information and click "Register"


                                                    Picture 4. Register window

After you finished registration, you will be re-directed back to "Login" window. Enter your user name and password and press "Login" button. If you enter correct information, "RGC" main window should pop-up.


                                                       Picture 5. Main window

 TIP: type /j philippines on the bottom of the window and press enter to jump on to the philippines server (which is less lag if your living in PH like me)

or click Rooms on the top of the window then when a window show up go to
DoTA / Asia / Regional / Philippines like on the picture below and dont forget to close the (Asia) Public room so you cannot see the created game there.

                                           Picture X: entering philippines Room
 

Playing your first game on RGC

First you need to set path to your "Warcraft III:Frozen Throne.exe". To do that click on "Settings" which is located in the upper-left corner of the client. Then click on Dota tab. Click on "Find" and navigate to your "Warcraft III" folder and select "Frozen Throne.exe". In case below i set my path to "C:/Program Files/Warcraft III/Frozen Throne.exe". Also you can choose default mode. In the end don't forget to save.

 Picture 6. Setting path

Now we are ready to sign for a game. To do that press "Sign" button in the bottom-right corner. Your nick should be added to "Signed players" list. When 10 players are signed you will hear sound "The game has been hosted" and text message on chat too(
 ). Start your "Warcraft III:Frozen Throne" by clicking on last button in a row on the top of the client.


                                                       Picture 7. Sign and run game

In "Warcraft III:Frozen Throne" go to "Local Area Network"
 (Lan icon)
and you will see list of hosted games. The game you signed for would appear blue.


                                                         Picture 8. Hosted games list"

Now join a game. Since you are signed for that game, your slot will be reserved for a minute. After a minute, all slot reservation are removed and everyone is able to to enter a hosted game. To make a game start, all players inside game need to type "!ready". As soon as possible all players type "!ready" bot will start a game and you will hear sound "The game is starting". Also you can check your ping to server by typing "!pingall". Haven fun in your game.

                                                         Picture 9. Typing "!ready"

Do not leave game before the Tree/Throne is dead or game is "!ff'd" or remaked. With "!ff" command you can vote for forfeiting game before the Tree/Throne is dead or with "!votermk" command to be remaked. You can check your win/lose ratio here.

Knowing client better.

Lets go back to main window. To explain better main window environment and functionality, we will divide it in few parts:
  1. Menu
  2. Rooms list and private messages
  3. Chat window and user list
  4. Games list and sign system
On the picture below you can see these parts graphically presented.

                                                       Picture 10. Main window parts


Chat window and user list occupy the central part of main window. Use text box on the bottom of the client to send text messages. Also you can use text box for "commands". With "commands" you can add friend, check somones profile, join another channel, whisper a user... To add user in friend list you must type "/f add name" (e.g. /f add Sir-rogers). You can check list of all commands here


(CTF Theme) "Frost By mugi" 6.20 & 6.60


                                                        6.20 version CLICK HERE
                                                        6.60 version CLICK HERE
                                                          Frost Wallpaper PACK

Instruction on how to use:
Extract and put the files on ms0:/PSP/Themes
Note: You need a CXMB plugin to use this theme
Refer to this post Click Here

known issues:
* the gameboot looks like it freezes because the wave stops moving on top of the video. it doesn't however
* infobar submenu offset is few pixels off. (game sub-infobar, cxmb apply themes)
* didn't find all text size values so some text is default size (fullscreen messages, system and battery info)
* musicplayer, videoplayer and osk are default. I suppose i ran out of memory as i only got corrupted images on compiling

Black Rock Shooter


Related anime:

    Black Rock Shooter (TV)


Alternative title:
ブラック★ロックシューター (Japanese)
Genres: action, drama, fantasy
Objectionable content: Mild
 
Plot Summary: Mato Kuroi just got into junior high school, and on the first day, someone catches her eye; her classmate Yomi Takanashi. The two meet.The innocent and naive Mato. The mature Yomi. Seemingly opposites, but the time they spend together only strengthens a growing friendship. But as they go into their second year at the school, they get placed in separate classes, and they begin to grow apart. But somewhere simultaneously... In another world, a young girl, blue fire residing in her eyes, Black Rock Shooter faces another young girl; this one holding a jet-black scythe, Dead Master, and a battle to the death begins to unfold.


My Own Comment:
At first, this may not be enjoyable to watch on others but when you really understand the storyline, you will find out that it can catch your eyes with the battle scenes and dramas on this anime series.

Download links:
Episode 1
Episode 2
Episode 3
Episode 4
Episode 5
Episode 6
Episode 7
Episode 8

How to install .ctf themes on your psp with firmware 6.20 pro b-XX

I will Upload a VIDEO later to this tutorial
Note: This will only work on Custom Firmware 6.20 pro b-1/2/3/4/5/6/7/8/9/10.
I will update this post later and add CXMB file on other Custom Firmware like 5.50 m33 and other version of firmwares.


Step 1:
You will need to download this file:
CXMB for 6.20 pro b-XX

-This one doesn't come with themes though so
you are going to have to download though separately.

Step 2:
 Extract the folder you downloaded. for you to do this, you will need a program like "WinRar".
Go to http://www.rarlab.com/download.htm if you don`t have WinRar

Step 3:
Connect your PSP via USB connection to your computer and check if you already have a "SEPLUGINS" folder which contains VHS.txt. If you dont have this then copy all the files you extracted and place them in the root of your PSP.

If you do already have the "SEPLUGINS" folder which contains VHS.txt then you are going to have to open up the VHS.txt and on a new line in the txt file write this.. ms0:/cxmb/cxmb.prx 1
Then save it. Now you are going to have to have to copy the PSP and CXMB folders you extracted and place them on the root of your PSP


Step 4:
Now once you have the those steps, unplug your psp from the computer and if you normally a TN HEN as your CFW ( which I wasnt) then open it up. Now on your XMB ( homepage for psp and ps3) press select. Then go down to "Recovery Menu" and press "X". Then go down to "Plugins" and press "X". Then scroll to "cxmb.prx". On the right hand side of the screen it'll say if it is enabled or not. Press "X" until it has "enabled". Then press "O" twice. Now press select once more and go to "Reset VHS" and press "X". Your PSP shall now restart.

Step 5:
Now on your XMB scroll left until you get to "Settings". Then scroll down to "Theme Settings" Then choose "Theme". Then scroll down and there should be a list of themes.
Congratulations. You now have cool CXMB themes on your PSP.


Thursday, 2 August 2012